Using Vista and Office Double Oh 7
Mel Babb
As I have used the new system, here are some things I’ve learned and done to make it the way I want it to be. These are random thoughts. Most of these I had to tease out of the vast amount of information available. Seems like I seldom find what I’m looking for the first place I look. Hope you find something useful in all this.
Search in Vista
 When wanting to find anything in your computer now, all you have to do is click Start (what some people call the pizza button), click in the blank right above it and type what you are looking for, like Word. A list of what is found displays immediately. Very nice. It searches Documents, Pictures, Music, Desktop. Also, it searches your e‑mail messages, saved instant messages, appointments, and contacts. However, it does not search the help files. To search Help, Click Start and Help and Support. When wanting to find anything in your computer now, all you have to do is click Start (what some people call the pizza button), click in the blank right above it and type what you are looking for, like Word. A list of what is found displays immediately. Very nice. It searches Documents, Pictures, Music, Desktop. Also, it searches your e‑mail messages, saved instant messages, appointments, and contacts. However, it does not search the help files. To search Help, Click Start and Help and Support.
One time setting to make Search easier to use
Click Start, Control Panel, Folder Options
Click Search Tab
Check “Use Natural Language search”
This probably should have been the default, so you don’t have to use stilted syntax to get the search to work like you want.
Index a drive or folder for faster searching
By default, Documents and email are already indexed. If you have files in other folders, you may want to index them.
Click Start Office Button
Type Index in search box (at bottom of list)
Click modify
Check what you want to index
 Click OK Click OK
Wait while a bar shows progress of the indexing.
Customizing the File Dialog box
The next few items deal with things to do with your files. First, open any file box. For now, Click Start, Documents.
Set up the files the way you like to see them. To set the look I like, click View, choose Details. Then open the folder options box. Click the Organize button in the upper left, and choose Folder and Search Options. (We’ve been here before a different way. As always, two to five ways exist to do things).

Show Hidden files, file extensions and full path in address bar
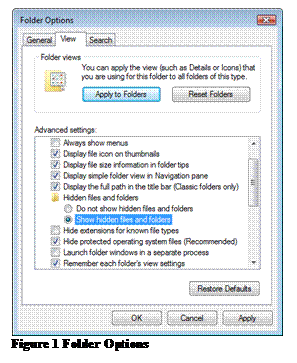
I like to see the Hidden files, file extensions and full path in the address bar in my file box. I used to get to the settings for these (while in a file box) clicking Tools, Folder Options. Check Display the full path in the title bar, uncheck the Hide extensions for known file types, and Dot Show hidden files and folders. Seefigure 1.
Display a menu bar permanently
Words mean more to me than the cryptic icons, so I like to see the menu with File, Edit, etc.
Click Organize, Layout, Click Menu
To turn the menu off Redo Organize, Layout, Menu
 Display menu for one use Display menu for one use
After I get used to the icons, maybe I’ll use this method when the menu is off:
Press and release Alt
Menu disappears when you pick a command from it.
If you don’t pick a command, Press Alt to turn menu off
Display Several Layouts in the File box
Different layouts let you see more info about files and folders.
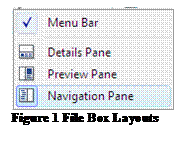
Click Organize, Layout. See Figure 3.
Each choice is a toggle, first click turns it on, next time turns it off.
Details displays the date created and other info about the file in a pane at the bottom of the screen
Preview displays content of the file in a pane at the right of the screen
Navigation displays folders in a pane at the left of the screen. I like navigation layout.
Use Headings to filter
Filter shows only what you pick, whereas sort shows everything by a type of category like name or size. Remember you’re still in the file box, using details view.
To filter, point at a heading.
Note: You don’t see drop down arrow until you point at a heading.
Click and pick what you want to filter by.
Press Esc to return to full list. Sometimes you may have to uncheck what was filtered.
 See Computer and all its folders See Computer and all its folders
Turn on the navigation pane, which is a pane on the left that displays the folders, by clicking Organize, Layout, Navigation pane.
Then at bottom of left pane, click Folders
Click Computer folder pane at left.
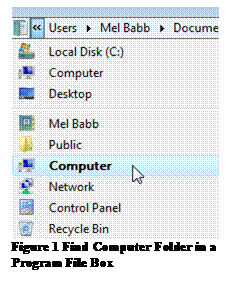
If a Program (like Word is open) to get to all the Computer files Figure 3
Click Office Button, Open
At address bar at top click <<, then Computer
Open the DOS Command box
Press Windows key+R for run
Type cmd, Press enter. The DOS box will open.
Change programs showing on Start menu
By default the last 9 programs used show.
Keep a program showing on the menu.
Right click a program, Choose Pin to Start menu.
The program is moved above the separating line.
Remove: Right click, choose Remove from list.
OFFICE 2007
When you try to use help in Office 2007, the help screen disappears as soon as you try to follow one of the steps. No more does the help stay put on the right side of the screen as you do the steps. You can make help stay on top, but it’s likely to get in the way and you’ll have to move it. I liked the old way better on this one.
The Keep On Top button looks like a push pin viewed from the top:  . If the window is set to say on top of other windows, the screen tip text changes to Not on Top, and the button looks like a push pin viewed from the side: . If the window is set to say on top of other windows, the screen tip text changes to Not on Top, and the button looks like a push pin viewed from the side:  . .
Minimize the Ribbon
The ribbon has replaced the menu and toolbars by combining them into one thing. The ribbon takes up a bunch of space at the top of the screen. You can collapse it to show just the tab headings and expand it to show the icons as needed. Double-Click the name of the active tab. Double-click a tab again to restore the Ribbon, or Ctrl+F1. When you first open a program, Home is the active tab.
Till next time. Happy Computing.
Mel Babb © 2008
Mel Babb, a long time member of HAL-PC, is currently available as an instructor and is on the Volunteer Help committee at HAL-PC. She runs her own company, PC Tutoring Services. She comes to your home and creates notes for you on what you want to learn. See her website www.melpchelp.com and/or contact her at mel@pchelp.com.
|

