VISTA TIPS
CHANGING THE CLOCK DISPLAY
The Clock is located at the right-most corner of your monitor, unless you’ve moved things around. The default display is 12-hour time: hours with no leading zero, minutes, and seconds. This may be easily changed to military time (24-hour time).
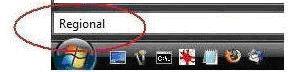
To change, click on the Start button to bring up the search box and enter REGIONAL. This brings up the Regional and Language Options screen.
2008-01_MLG_01-02
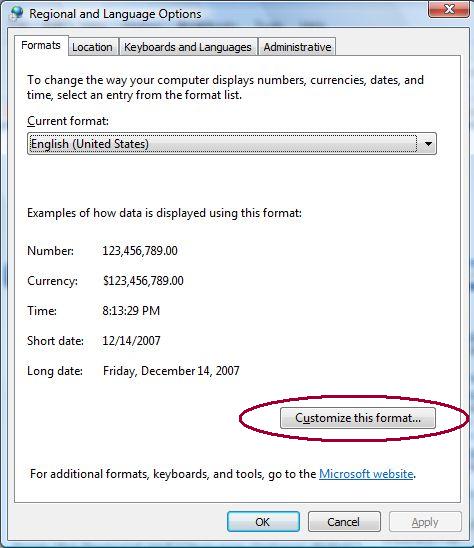
Select CUSTOMIZE THIS FORMAT, then click on the TIME TAB (next screen shot) to access the change time format dropdown.
2008-01_MLG_01-03
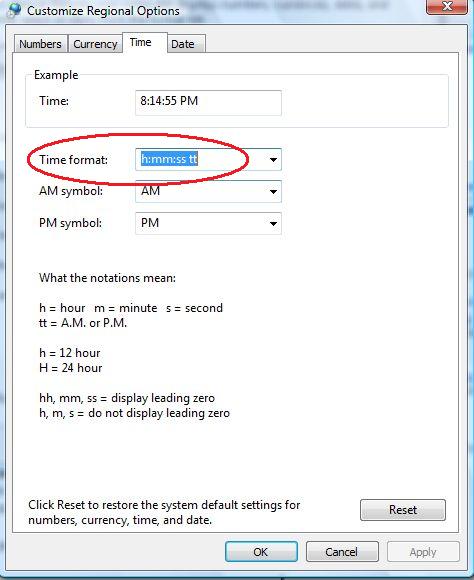
To display the default 12-hour time, enter this notation: h:mm:ss tt and the display will show: 07:07 P.M.
For 24-hour (military) time, enter this notation: H:mm:ss and the display will show 19:07.
Wondering why the seconds don’t show? Back around 1995, it was decided that displaying the seconds used too much processor time.
Want to put your name on the taskbar? In the screenshot above, edit the “AM symbol” and “PM symbol” boxes to add text to the “AM” or “PM”. For instance, to display the name “Missy” on the taskbar, enter “AM Missy” and “PM Missy” in the appropriate boxes and click APPLY.
HIDE OR SHOW INACTIVE ICONS
The Notification Area (right end of taskbar) displays icons for programs running in the background. Examples are the clock, volume control, printer (displays when printing), and virus and security software. You can change the settings to hide or show inactive icons.
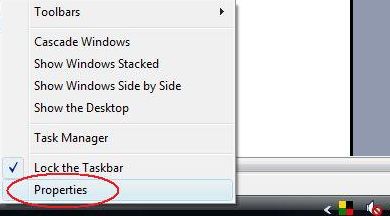
Right-click on a blank area of the taskbar (or the start button) and select PROPERTIES to change.
2008-01_MLG_02-01
Next, select the NOTIFICATION AREA tab. The first section, ICONS, gives you the option to declutter the notification area by hiding inactive icons. The second section, SYSTEM ICONS, allows you to select which icons will be displayed. Click OK when finished.
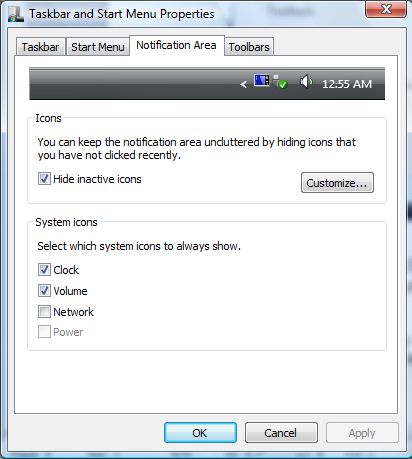
2008-01_MLG_02-02
Note: There will be an arrow next to the Notification Area (1) when inactive icons are hidden (points left) or (2) when more icons are displayed and may be hidden (points right). Click the arrow to display the additional icons, click again to hide.
VISTA KEYBOARD SHORTCUTS
Windows Key + G Cycles through Gadgets
Windows Key + U Activates Ease of Use Center
Windows Key + X Opens Mobility Center
Windows Key + Tab Cycles through taskbar programs using Flip 3-D
Windows Key + T Cycles through taskbar programs
Windows Key + Spacebar Bring all gadgets to front and select Sidebar
For an extensive listing of all keyboard shortcuts in Vista, go to Windows Help & How To on Microsoft’s website (http://windowshelp.microsoft.com/Windows/en-US/Help/2503b91d-d780-4c80-8f08-2f48878dc5661033.mspx).
VISTA ON-SCREEN KEYBOARD
Vista’s new On-Screen Keyboard (OSK) provides an alternate input device right on your computer screen. Microsoft has a good set of tutorials on using OSK (http://www.microsoft.com/enable/training/windowsvista/osk.aspx). There are seven keyboard layouts to choose from: enhanced, regular, standard and blocked, plus 101, 102, and 106 key layouts. There are three modes for entering data with a mouse: clicking on a key, hovering over a key, and scanning, which selects keys with a single button or key. There are also options to change the fonts, provide an audible click when a key is pressed, and to always keep the keyboard on top. Finally, you can start OSK for use in a current session or set it up to automatically start each time you log on.
To activate OSK, click on the start button and type OSK in the search box. Alternately, using the keyboard, first open the Ease of Access Center by using Windows Key + U. Next, under Quick Access to Common Tools, start OSK using ALT + K.
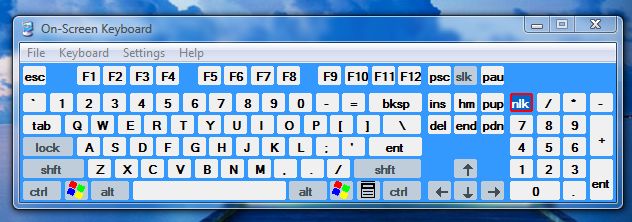
2008-01_MLG_04-01
And if, for whatever reason, you have to troubleshoot a computer without a working keyboard, all you need is a working mouse and OSK.
FIND THE MISSING GAMES IN VISTA BUSINESS
My new computer came with Vista Business installed, which meant no games. After a few days of Freecell withdrawal, I did a bit of research and learned the games are still there, but access to them is turned off.
To get the games back, go to CONTROL PANEL. Click on PROGRAMS AND FEATURES, and click continue to the User Account Control prompt.
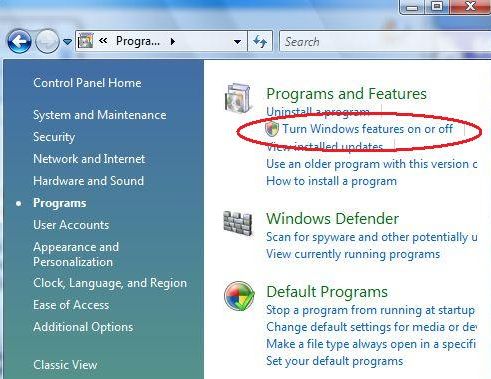
2008-01_MLG_05-01
Select TURN WINDOWS FEATURES ON OR OFF. Go down the listing until you find GAMES and check the box beside it to install all the games. To install only select games, click on the little plus mark beside GAMES. It will expand and show a list of individual games. Click on those games you would like to install. Finally, click OK.
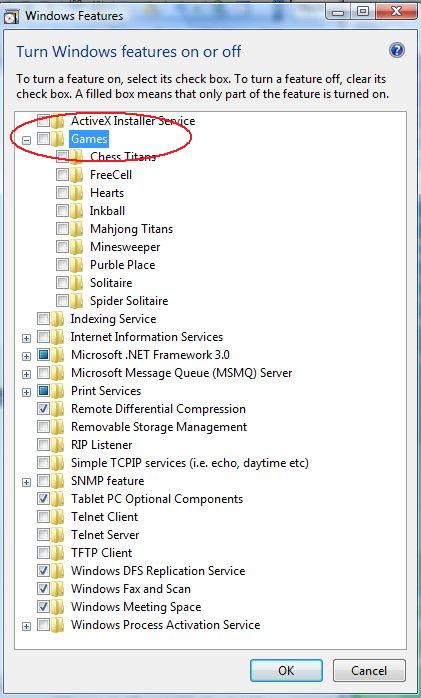
2008-01_MLG_05-02
Note: There are additional selections in the list, please be careful not to check anything else as changing them could cause problems with your system.
JUST A GOOD TELEPHONE TIP!
This is for all of us who have ever wasted too much time navigating the infinite maze of a telephone automated menu system hoping to hear a human voice. Paul English, the founder of GetHuman (http://www.gethuman.com/) has compiled a huge list of businesses along with instructions on how to bypass their menu systems and get a real live human! As it states on the website: The gethuman™ movement has been created from the voices of millions of consumers who want to be treated with dignity when they contact a company for customer support.
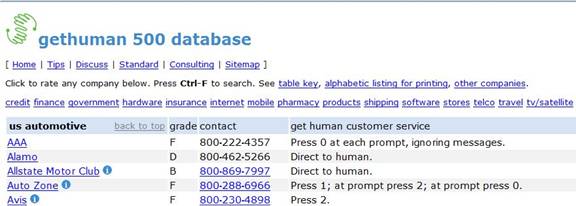
2008-01_MLG_06-01
TEMPLATES FOR THE NEW YEAR
Microsoft Office Online (http://office.microsoft.com/en-us/default.aspx) is a great resource. They offer self-paced free training courses, tips, clip art, solutions and templates, among other things.
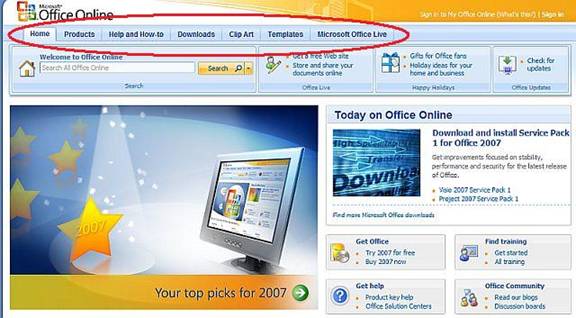
2008-01_MLG_07-01
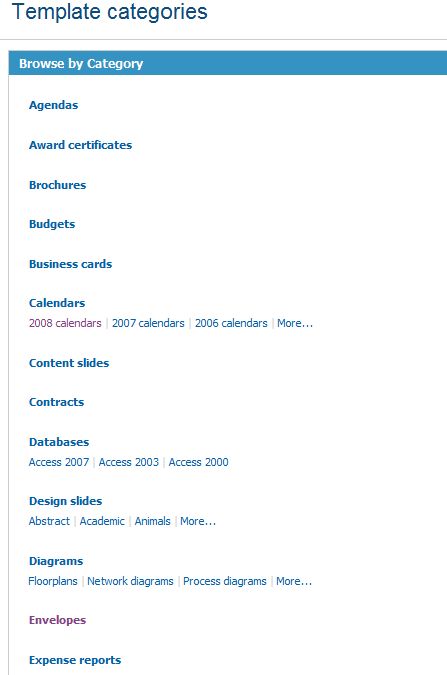
Click on the Templates tab to see current (and timely) offerings. To see a list of all available templates, go to the Template Categories page (http://office.microsoft.com/en-us/templates/CT101527321033.aspx).
2008-01_MLG_07-02
Since it is a new year, it is a good time to start out organized. All types of templates are offered: for organizing home items and collections; for making greeting cards and envelopes; for students and teachers; for day planner sheets and calendars; for legal and business forms. This can be a real timesaver when you need a form, a form letter, or a fax cover sheet. Download it, open in the appropriate application and you’re good to go.
|