Windows Vista - continued
If the Connection test was unsuccessful or you need to check configuration settings.
NOTE: If you did not have all 4 items available for your dial-up, OR the Dial-up connection failed, see the below information.
NOTE: If you are still in the Connections tab of Internet Options, you need to click OK and close those screens. (The unsuccessful Dial-up may NOT show until you close and re-open Internet Options).
Go back to Internet Options. (Click on round Windows "START" button in the lower left corner of your screen, click Control Panel, click Network and Internet, click Internet Options, then the Connections tab). If needed, see Figures 1 through 5.
Notice the new HALNet connection in the "Dial-up and Virtual Private Network settings" box. See Figure 12.
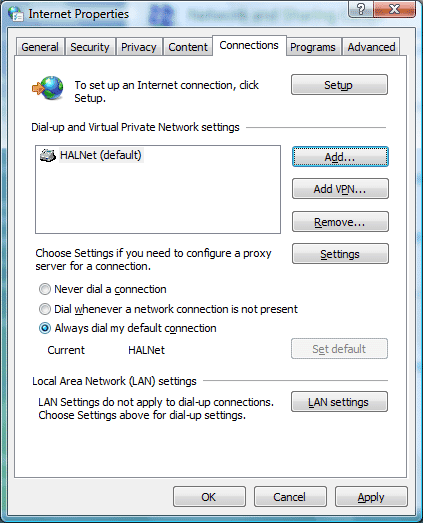
figure 12 - Connections Tab
Make sure a dot is by "Always dial my default connection" so it will automatically dial when needed.
Note: If you have more than one connection in the Dial-up and Virtual Private Network settings box, then you will need to make sure that HALNet is the default if you want it to dial HALNet every time you connect to the Internet.
If needed, click on HALNet shown in the "Dial-up and Virtual Private Network settings" box and then click the "Set Default" button to the right. See Figure 12
Click on the Settings button.
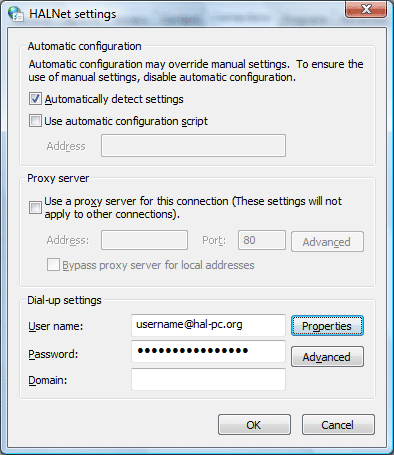
figure 13 - Dial-up settings box
Put a check in "Automatically detect settings". See Figure 13.
Make sure you have the correct HALNet User name.
(your HALNet email address - username@hal-pc.org) in lower case letters.
Retype in your HALNet Password. (Note: Windows will put in 16 dots by default. Do not worry if you see too many dots here the next time you view this screen on your computer.)
Click the Properties button on the right.
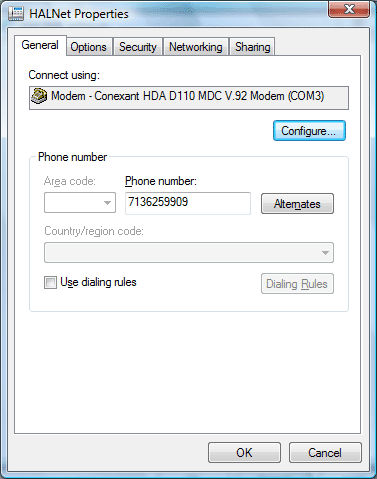
figure 14
Make sure the area code is grayed (or faded) and that there is NOT a check in "Use dialing rules". See Figure 14.
Note: Your screen should have the name of your modem in the box labeled "Connect using:".
Click on the Options tab.
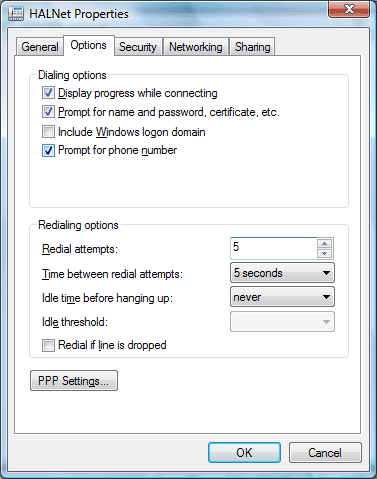
figure 15
In this area you can adjust the redialing attempts. See Figure 15 for the suggested settings. (This area controls the Dial-up Networking redial attempts.)
Click OK. This will take you back to the HALNet Settings screen (Figure 13).
Click on the Advanced button on the right.
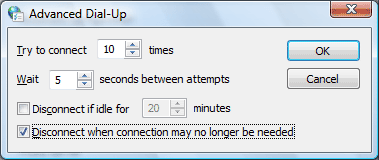
In this area you can adjust the redialing attempts. See Figure 16 for the suggested settings.
(This area controls the Internet Explorer redial attempts, plus disconnect options.)
Click OK. (This will take you back to the HALNet Settings screen in Figure 13).
Click OK again. This will take you back to the HALNet Settings screen (Figure 12).
Click the General tab.
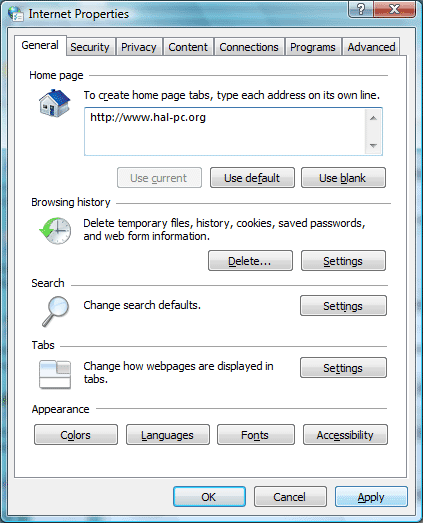
figure 17
Here is where you can put the HAL-PC web site as your default (main) home page. See Figure 17.
In the Address box, erase what is there and type in, www.hal-pc.org (or as it is above). Note: Simply typing www.hal-pc.org should work fine.
We recommend you continue to the next security section, and examine the below information. However, if you wish, you may click OK and close out of Control Panel, back to your desktop.
Optional Settings to Increase your Privacy and Security:
Click on the Privacy Tab. See Figure 18
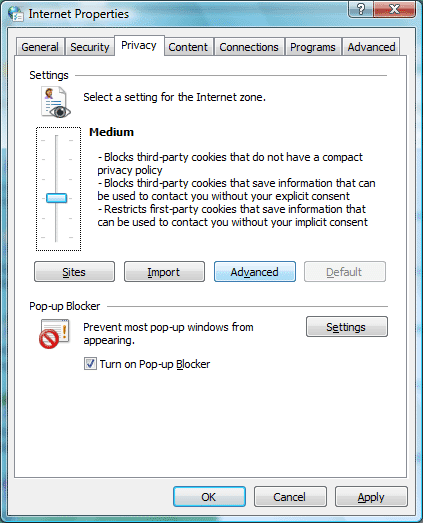
figure 18
Click the Advanced button near the middle right.
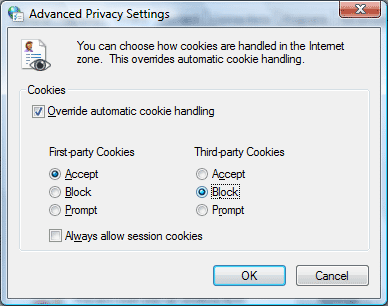
figure 19
Put a check in the "Override automatic cookie handling" check box and set the First Party Cookies to ACCEPT and the Third Party Cookies to BLOCK.
Click OK to the Advanced Privacy Settings box.
Click on the Advanced tab (top right).About 2 inches down, uncheck any "Enable Install on Demand" check boxes. There may be one or two of these.
Note: For more information on protecting yourself see the HAL-PC site: "Protect your PC" http://www.hal-pc.org/support/safety.html
Click OK. Continue clicking OK until you close all the dialog boxes. This should take you back to the control panel or Network and Internet connections screen. Close these screens by clicking the X on the top right.
Finished. You should now be able to double-click your web browser (Internet Explorer, Netscape, etc.) and connect to HAL-PC (HALNet).
For setting up your Email see: http://www.hal-pc.org/support/Look under E-MAIL. Click on the E-mail program you are using to see screenshots of how to configure it.